 |
 |
 |
 |
Knitting Bust Darts with short rows and vertical darts allows custom contour shaping in hand knit garments.
We all have unique concave and convex contours all over our bodies. Some are more prominent than others, and we may want to custom tailor different areas of our hand knits to accommodate them in a stylish manner. These darts transform a garment which is uniformly as wide overall as our widest measurement to a garment which is based upon our narrow shoulders or the measurement across our back at the base of the armholes. With the addition of volume in only those areas where it is needed, we then produce a slimmer, more shapely silhouette.
While short rows and vertical darts may be used for a wide variety of shapings, I will focus on the bust in all of my examples. The individual hand knitter may then use these examples as a reference for applying them to their own requirements.
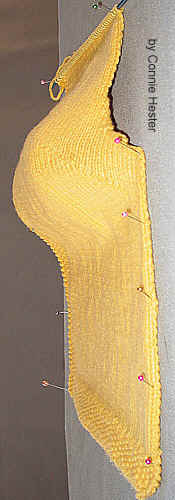
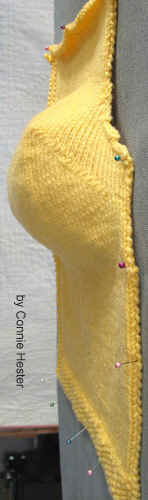
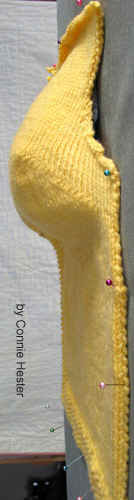
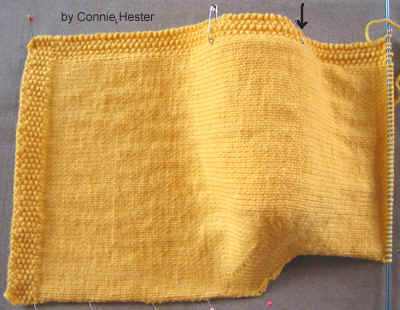
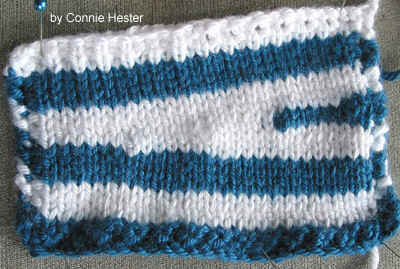
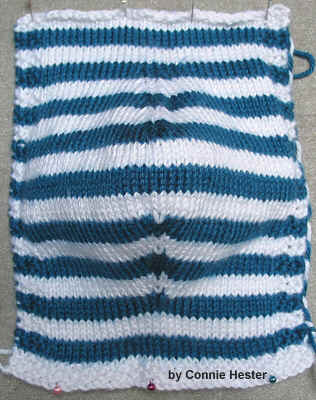
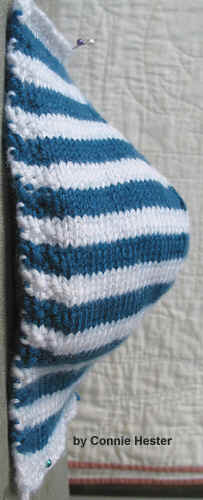
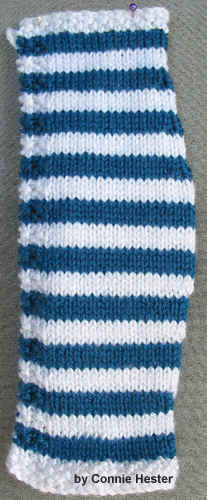
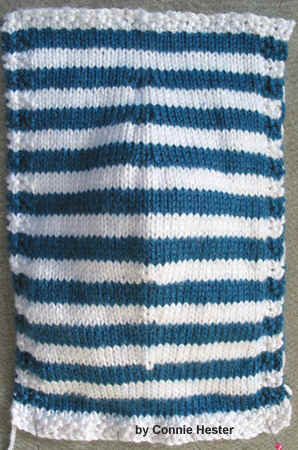
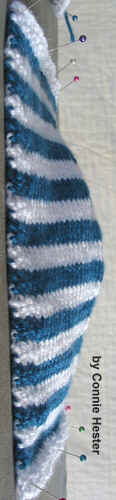
In the photos below, 3 inches of short rows have been inserted into the left front of a jacket. I have stuffed the middle portion of that 3-inch area to resemble a shapely bust in place, but these same additional 3 inches could likewise accommodate fullness in the upper chest area, the chest area immediately below the darts, or all 3. (See all 3 upper photos, below.) If the main bust area is lower, it would be better to start the short rows an inch lower. Likewise, if the bust area is higher. These photos simply illustrate that the short rows needn't be *perfectly* placed for them to work, and they can accommodate a wider spread of prominence. The bottom photo indicates the additional 3" of length created which is available now in the middle of the front bodice.
|
|
|
|
Method Two: 1. Measure circumference at widest point of bust. 2. Measure circumference around bottom edge of bra. 3. Add 5" to measurement in #2. 4. Compare measurements in #1 and #3. 5. Difference in number of inches determines inches of short rows to add.
Method Three: Allow the cup size of your bra to determine the number of short rows to add: 1" for an A-cup, 2" for a B-cup, 3" for a C-cup, and so forth.
On, say, Row 75 of work as progress towards armhole (this row becomes 1st row of the short rows and is 1" below beginning of armhole shaping), knit to within 8 sts of side edge. With yarn in front, slip that 8th st to right-hand needle as if to purl, pass yarn to back, and slip 8th st back onto left-hand needle, effectively "wrapping" that 8th stitch.
Turn work (not knitting the 8 sts on the side edge), and purl to within 8 sts of opposite side edge. With yarn in back, slip that 8th st to right hand needle as if to purl, pass yarn to front, and slip 8th st back onto left-hand needle, "wrapping" that 8th stitch.
Turn work, and knit to within 9 sts of side edge. As above, wrap that 9th stitch. Turn work, and purl to within 9 sts of opposite side edge, wrapping that 9th stitch.
On next 2 rows, will knit and purl to within 10 sts. On following 2 rows, to within 11 sts.
When have completed number of rows to equate to the number of inches to be added, on next Knit row, upon reaching each wrapped stitch, pull the "wrap" up onto the needle along with the stitch it is wrapping, and knit them together as one stitch. This will eliminate the wrap "bar" across those stitches. Continue to the side edge, picking up each wrapped stitch encountered on the left side of work.
On the purl row, do likewise on the opposite side of the work, purling the "wrap" with the stitch it is wrapping.
Return to working garment one more inch to the armhole shaping.
Method Two:
Instead of "wrapping" the stitches, simply turn the work and purl, or knit, to opposite side. Doing so produces a small hole. After all short rows have been completed, on the row which knits/purls all the way to the side edge again, rather than picking up the wraps (since there are none), pick up the bar between stitches where each hole appears (moving left needle from front to back), and knit into the back loop (twisting the stitch). [On purl rows, insert left needle from back to front, and purl into the front of the stitch.] This method eliminates the extra bulk of working 2 stitches as one stitch with heavier yarns.
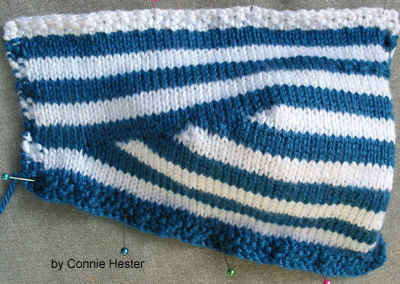
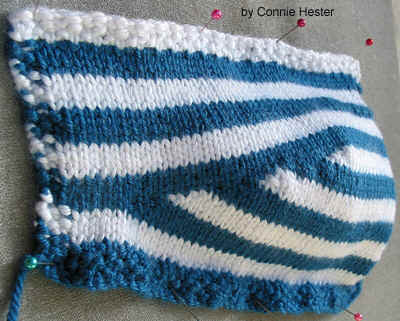
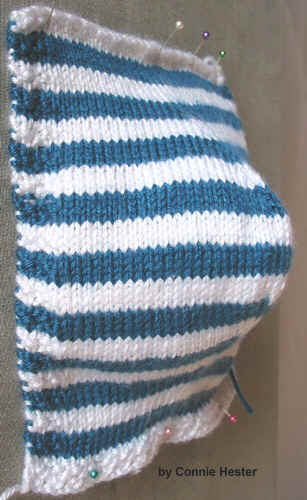
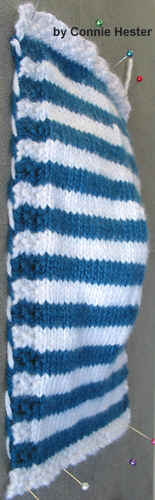
When I add only 1" of short rows for enough shaping to, say, just prevent the bottom front edge of a garment from hiking up, I spread the turns over multiples of stitches. For example, rather than turning 6 stitches from the side edge on the first knit row, followed by turning 7 stitches (and then 8, and then 9) from the side edge on the subsequent knit row, I might turn 8 stitches on the first knit row, followed by turning 12 stitches from the side edge on the subsequent knit row, and 16 stitches on the knit row after that. In that way, I end up nearer the center of the breast when I have completed my short row turns. This works for a smooth gradation in solid-colored Stockinette Stitch, but it creates ugly, very pointed stretched stripes. (See lower right photo, below.) What this sample does not show is the subsequent stripes stretched out and appearing farther and farther to the right (and becoming increasingly obvious and even more ugly). I did not pusue this option.
When I skipped only 2 stitches for each turn (turning on the 6th, 8th, 10th, and so forth), the edge of each stripe simply slanted a bit more than when turning on each consecutive stitch.
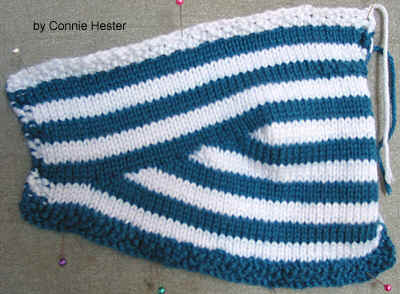
I was very surprised with the last outcome (first 3 photos, below). I made my turns on stitches 6, 7, 8, and so forth, and I thought it all looked good as I viewed it straight in front of me. However, when I held the sample up to my body, it looked as if a bull's eye was being drawn around my breast! I realized I would need an alternative method of adding contours to my knitting which would not interfere with the stripes: VERTICAL BUST DARTS.
While short rows were visually inappropriate for my stripes, the flat "bull's eye" sample illustrates very well how to successfully work within pattern stitches with short rows. The most important rule which must be followed is maintaining the established pattern repeats. In the case of my stripes, I maintained units of 4 blue rows + 4 white rows. Each unit measured 1 inch, so I inserted 3 sets of striped short rows for 3 inches of short rows. If I had been using a pattern stitch with a 4- or 8-row repeat with this same yarn, I would have successfully inserted 3 inches of short rows into the overall pattern stitch on the garment unobtrusively.
For pattern stitch repeats which do not match up perfectly with the number of rows per inch in gauge, I would just add enough more short rows to make the pattern repeats come out even. For example, if I were using a 6-row repeat stitch pattern with yarn which produced 8 rows per inch (requiring 24 rows for 3 inches of short rows), I would do 3 pattern stitch repeats for 3 inches of short rows. (That one came out even.) If I were knitting a 10-row repeat with the same yarn, I would need to choose whether to do 20 rows (2 1/2 inches) of short rows or 30 rows (3 3/4 inches).
 |
 |
 |
 |
SHORT ROWS are ALSO commonly inserted in small sections for other sorts of shapings. These include uneven shoulders, dowager's hump, shirtail hems, back neckline issues, and scalloped edges. To accommodate a larger stomach, sometimes a few short rows may be used across the entire front, completed (by picking up the wrapped atitches and working all the way to the side edge again), and then inserting another small group of short rows in the same manner. The effect of doing this instead of working several inches of short rows together at once is that a more vaguely defined fullness will be created and no long diagonal "dart line" will be left as a result.
____________________________
The closer together the increase and decrease rows, the more cup-shaped the created pocket will be. For less-defined additional volume, the increases/decreases need to be spread out over more rows, as in the far left photo of the 1" vertical darts in the bottom 4 photos, below.
|
<======> |
 |
 |
 |
 |
 |
 |
 |
The contours will be more pronounced along the vertical axis over each breast, and extra volume will also extend horizontally beyond this vertical line a bit (more so, based upon the more inches added), forming a semi-spherical-ish pocket at the widest point of the vertical dart if increases/decreases are more frequent on the approaching rows. It will still be our body's contours which define the shape of this extra volume. The 1.) smaller the vertical dart or the 2.) more gradual the increase/decrease of stitches, the more subtle the additional volume will be. Both the 3" and the 1" vertical darts above were created over 7"-worth of rows.
In the 3-inch vertical dart in the top four photos above, I increased 1 stitch on both sides of the middle stitch every other row (every Knit row in Stockinette Stitch) until I had increased 3"-worth of stitches. In this case, I needed 18 stitches, so I increased 2 sts per row, every other row, over 18 rows. Then I worked 6 rows even, for a total of 24 rows which equated to 3" of the 7" height over which to work the entire vertical dart. At this point, I could have worked a few more rows even to add even more softly contoured volume at the point of largest measurement.
For the upper half of the vertical dart, I mirrored my actions on the lower half. After working 6 rows even, I decreased 1 stitch on each side of the middle stitch on every second row.
To increase, I chose to "make 1" with the bars between the middle stitch and the stitches to either side of it. (Be sure to twist this made stitch so that it does not leave a hole. Twist those to the left of the middle stitch counter-clockwise, and twist those to the right in a clockwise direction.) Notice the obvious white stitch at the bottom of the white rows on the bottom half of the 3" vertical dart axis. Before making the second such increase on the 1" vertical dart, I realized that the increase rows are more invisible in striped patterns if they can be included in the middle of the stripe instead of on the first worked row of the stripe. Notice how invisible the increases are, after the first one, on the 1" vertical dart. To do the decreases, K2tog to the left of the middle stitch, and SSK to the right.
To create the 1" vertical dart, I increased 1 stitch on both sides of the middle axis stitch for the dart, and then I repeated that increase after each 1" (8 rows) for two more times - a total increase of 6 stitches over 3"-worth of rows. Then I worked 1" even. Next, I reversed the increases for decreasing by 2 sts over each inch for the top half of the vertical dart.
As a general point of reference, the length of the vertical dart will extend from about 4" below the first armhole bind-off over about 7"-worth of rows above that point for an A-cup through a C-cup (increasing 1"- to 3"-worth of additional stitches). This includes 3" of rows over which to increase to the fullest point, a work-even area, and then 3" to decrease the stitch-count and taper smoothly back into the upper chest area. (There is still plenty of flexibility within those suggestions.) Greatest fullness will be at about 1" below the first armhole bind-off. (So use this as a reference for adjustment.) For each additional cup size, add 1" to both the number of rows over which to increase and the number of decrease rows. This means the vertical dart will be worked over 9"-worth of rows for a D-cup, 11" for a DD-cup, and so forth - unless you have a petite bone structure and do not have the extra length inherent in a larger-sized garment. In this case, to avoid adding more rows of length, it may be necessary to add short-rows along with the vertical darts. In addition, if MUCH extra volume is required for ANY body type, this is another situation requiring the use of both vertical darts AND short-rows, breaking up the concentration of additional stitches and rows required for the most subtle sylish fit. The short rows would need to be centered on the fullest point of the vertical dart (and keep in mind that the short rows will be included in, or added to, the vertical dart row-count).
If a more gradual increase in stitch-count is desired, begin lower than 4" below the armhole and increase the intervals between increases. The vertical dart may even begin at the waistline, but don't start so low with so many extra stitches that the slimmer under-bust area is lost, negating the reason for using vertical darts in the first place. If this becomes a possibility, it is time to add short-rows, too.
Large busts may want to consider the option to increase the 1" of "work even" rows between the 3rd and 4th inches of a 7" vertical bust dart to 2"-3". Likewise for larger bosoms creating longer bust darts.
If the upper chest is large as well as the bust itself, it may be desirable to both 1.) work more rows even at the fullest point of the vertical dart (broadening it and raising it up a bit) and 2.) extend the intervals between decrease rows for more gradual tapering of the upper vertical dart. The upper and lower portions of the knitted vertical dart do NOT have to be shaped identically. It may also be appropriate to begin the vertical dart higher than 4" below the armhole.
The ability to "read" your pattern stitch and to know where the stitches should go which create the pattern is critical. You must anticipate what each new stitch should be in the overall pattern stitch schematic. The middle stitch of the vertical dart can act as a seamline, out of which the pattern components emerge as the stitch-count grows and shrinks. Each pattern stitch considered will need to be tested to see if it can be appropriately manipulated along the vertical dart without creating any noticable problems. Imperfection does not necessarily disqualify a pattern stitch. Often missing elements will go unnoticed.
_______________________
Using BOTH SHORT ROWS AND VERTICAL DARTS simply requires including the short-row count within the vertical dart row-count. If 3" of short rows will be used in addition to 1", 2", or 3" vertical darts, for example (increased over 3" of rows, worked even for 1", and then decreased over 3"-worth of rows), begin the vertical dart and the short rows at the same time. This is because the 3" of short rows (begun 1" below the first armhole bind-off) will include 3" of the vertical dart rows since they add 3"-worth of additional rows across the entire chest and end again on the same row 1" below the first armhole bind-off. The diagonal pick-up row (upon completion of the short rows) will then point to the middle of the vertical dart, which will continue on above the armhole bind-off rows.
When doing BOTH Short Rows AND Vertical Bust Darts, be mindful not to work Short Row stitches beyond the vertical line created by the Vertical Dart. If more Short Rows are desired (which WOULD cross the line), do the Short Rows with fewer stitch spacings between each turn, OR repeat groups of Short Rows. Including Short Rows which are worked even (without increases/decreases along the middle Vertical Dart stitch) together with the Vertical Bust Dart will produce a less abruptly contoured cup shape.
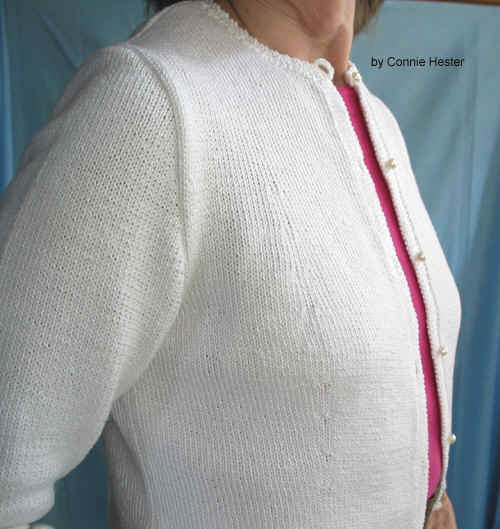
Below is an illustration of my Knit CrewNeck Cardigan Pattern which incorporates 2" of chest measurement ease plus both 1" of Short Rows and 1" of Vertical Bust Darts. The Vertical Bust Darts include an inch of unworked length in the middle of the Vertical Bust Dart for a nice smooth contour. The fingering weight cotton yarn used here allows us to use the fairly clearly seen vertical shaping as a design element. The increases and decreases blend into the background with most yarns. Short Row "darts" become invisible by lifting and knitting the wrap and its stitch together, as described above.
|
_______________________
APPLYING KNIT BUST DARTS to existing patterns can be as simple as just adding them to the size pattern with 2"-4" ease which you normally knit for yourself. By doing so, the knit garment will drape better and look far more sophisticated in fit than without knitted bust darts.
A second way to apply bust darts is to choose knit patterns based upon the proper fit for your shoulders or across the back at the base of the armholes. Insert short rows and/or vertical bust darts to handle the extra volume in the front of the garment for a totally custom fit.
_______________________
In CONCLUSION, if the bosom hangs low, begin shaping an inch lower than suggested. If it hangs very low, begin 2 inches lower. If the greatest fullness is higher in the chest, begin higher. Fortunately, neither Short-Rows nor Vertical Darts need be absolutely perfectly placed in order to be used as intended. Just make some adjustments on the next knitted garment.
Again, every body is unique, so I hope all of my suggestions provide a good starting point for VERY EASY personal alterations. Use some cheap worsted-weight yarn (but a fairly tight gauge) to make it go faster. On your first try, you may find that you need to rip back a little lower and begin the shaping again - but this is an investment in time which is well worth the result. You will finally know EXACTLY how to select sizes and modify knitting instructions specific to YOUR body. This will result in your consistently producing garments which you actually LOVE to wear!
My Knit Short Jacket Patterns include detailed instructions for short-row shaping and/or vertical bust darts for each of their 7 sizes (finished chest measurements 38" through 61"). My Knit CrewNeck Cardigan Pattern incorporates both short rows and vertical bust darts over Sizes 35" - 61", as does my Knit Hemmed Jacket Pattern . Instructions include exact stitch and row counts in each size for placement of the darts.
***This article is for the personal use of the individual. Any reprinting of this article, including posting on blogs or websites, constitutes copyright infringement.
KNITS:
PRIVACY POLICY: No personal data is collected for any purpose other than to complete purchase and delivery transactions. Thereafter, all personal data is deleted and/or shredded. Connie Hester alone receives all customer data. This policy has been in place since starting business 43 years ago.
All images and text copyright Connie Hester.
www.ConnieHester.com